Posts

Not really a hateful 8 ...

Image
It was more like one apathetic and one stubborn and 6 who just needed to be told what to do. The OCPOTI* gave me LOTS of good advice about why the motor was stuck. Some of it I was even able to follow. pistons are rusted to the cylinder walls, why not check the rod bearings, and that timing chain looks rusty. So I pulled a couple of rod caps and looked at the crank journal. Not only do the crank and bearings look pretty good - I think it is so cool that they stamp the "FoMoCo" logo and a registered trademark symbol on the underside of a piece of metal almost no one is ever going to see. A nice show of pride there. Mid-week, Other_Doug dropped by to look at the machine. I told him I was having trouble removing the crank bolt - and so he asked if he could borrow my breaker bar, put it on the bolt and threw his shoulder at it like he was doing the shot put. It turned right out. That seemed to ignite a flurry of activity - and so while the engine still world not turn, we removed ...
Cranky case

Image
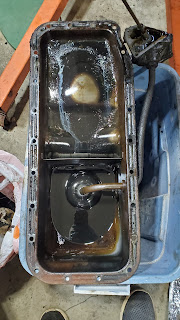
Now that the engine is on a stand, I can do a better job of figuring out why it won't turn. So, I took a coffee break today and opened up the bottom of the engine. The deconstruction probably took 30 minutes. I turned off the umpteen oil pan bolts and managed to lower it without spilling the sump. Actually - it looks pretty good. A lot less sludgy than I was expecting after 60 years. I did drop a wrench in there by accident - and gladly it neither splashed everywhere nor did it completely swallow the tool before I grabbed it. I had to remove the oil pump in the process. This weird thing has an oil pump outside the engine. You can see it in the upper left corner of the picture above. It seems to turn - so that is positive. I also removed the fuel pump. It is mechanical - with a lever that slides into the front cover and is pushed up and down by an eccentric wheel somewhere in there. I don't have the front cover off yet - but the pump and fuel filter came off without incident. I ...

All around the mulberry bush, the ...

Image
 This past week I bought materials to make adapter arms for the engine stand. I got some 1-inch steel square tube for the arms, some 7/16 grade-8 bolts to attach from the arm to the engine, and some washers to make a bushing for the bolts and so everything was steady in place. I was going to buy a cutoff wheel for the grinder Dave loaned me, but it turned out that Dave had some so he dropped a few off on my front porch late one night. On Saturday I went over to Doug's to borrow his drill press to put some holes in the square stock. It turned out that Doug also had a bandsaw, so I used that to cut the square tube into 6 inch pieces instead of the cutoff wheels. Then we went to Doug's drill press. As these things go, he only had the 7/16 drill bit I needed. He did not have the bit I needed for the other side. So I ran over to the ACE hardware store near his house and eyeballed a good 9/16 bit for the larger bolts. I drilled one of the 7/16 and sized up the hole to make sure it wa...

Engine Hoist supplemental

Image
I took some measurements and designed a "Dancing Chic Productions" custom knob for the valve on the engine hoist. The first draft took about 15 minutes to design in TinkerCad and an hour to print. It was a little tight and because I built it just to size. It broke in half as I tried to remove it. I expanded the center hole by 0.1mm which seemed to be the only dimension that needed fixing. I reprinted with 4 perimeter shells and 40% fill density which is a combination that makes for good strength with a reasonable amount of material cost. I used PLA - PET, ABS or Nylon would be 'tougher', but I have very good results with PLA and it is so easy to print. Plus it was what was in the printer when I went to run it. Since it broke on the shank the first time, I reenforced the part where it actually torques the screw by making it oval instead of round. Just putting more material structure to back the turning force. The finished product took about 2 hours to print and used ab...

It is outta ther ... wait, what?

Image
  This is how the day started: steely eyed and ready to work. A little militant even. Get the truck back, deal with leaves, pull an engine.  On Friday, the tow truck people made an appointment for between 10~11a on Saturday morning. At 8a on Saturday, they texted me that they were ~90 minutes away. At 830a, the guy called me to tell me he was 10 minutes away. Breakfast got cut short  -  but the truck is home. She runs, but she is angry about it. My guess is water pump + the sympathetic damage to the serpentine belt. Leaf collection is boring - but I did break the case on my leaf blower in the process. That added a nice rythmic 'wonk wonk wonk' to the process. I got the hoist into place and ready to work. That is the short version. I really have a lot of space when it comes to parking cars in my garage. When it comes disassembling them - not enough. I hauled the gas tank and drive shaft outside into the front yard. I swapped out the janky front left "driving" wheel/ti...

No valve for you today

Image
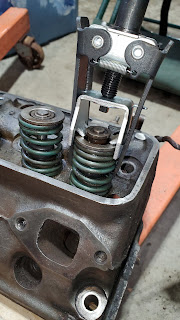
I thought I wanted to remove my valves and valve seats. To do that, I needed a spring compressor tool. These things come in lots of shapes and sizes. Some of them look like a bent fork and rely on having the rocker arms in place (or at least the studs). Some of them look like a giant C-clamp that connects on both sides of valve. They rely on the heads being off. Some of them look like the Recognizer from the movie Tron - with a screw on top and hooks down the side. They range in price from: free for loan at the autoparts store to this thing with umpteen parts for $75. I was going to borrow the one from the parts store - but it gave me the willys. I looked at it several times and kept coming to the conclusion that I was going to hate using that tool or get injured in the process. Oreilly's and Autozone loan the screw-hook Tron thing, but the hooks are not well designed for gripping a heavy duty spring. I am sure with a hose clamp to secure it I could make it work but I didn't w...

Wanted: enough sense to wear Personal Protective Gear

Image
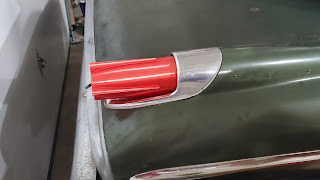
I was stalled for a week or so. Life is like that sometimes - too many obligations or chores or just opportunties for distraction. So I went a whole week without touching the car. In my head, I had planned to borrow the hoist & stand from Doug a week ago, and that was what I was going to do next. But even though other stuff kept getting in the way of that objective, I just didn't go to the next things on my list. A couple of nice things did happen to me in the middle of the week. My friend John offered to do some 3D modelling for some of the trim parts. Namely the 'after burner' tail lenses. He sent me one of his models and I printed the shell just to see. They are so cool !! If you want to nit pick, they have lots of things that can and probably will be adjusted before I resin cast an actual part, but I think it is super neat to be able to design, print and test fit a prototype. Additionally Dave dropped off some gifts for the project. He loaned me a very nice angle gr...